
>>

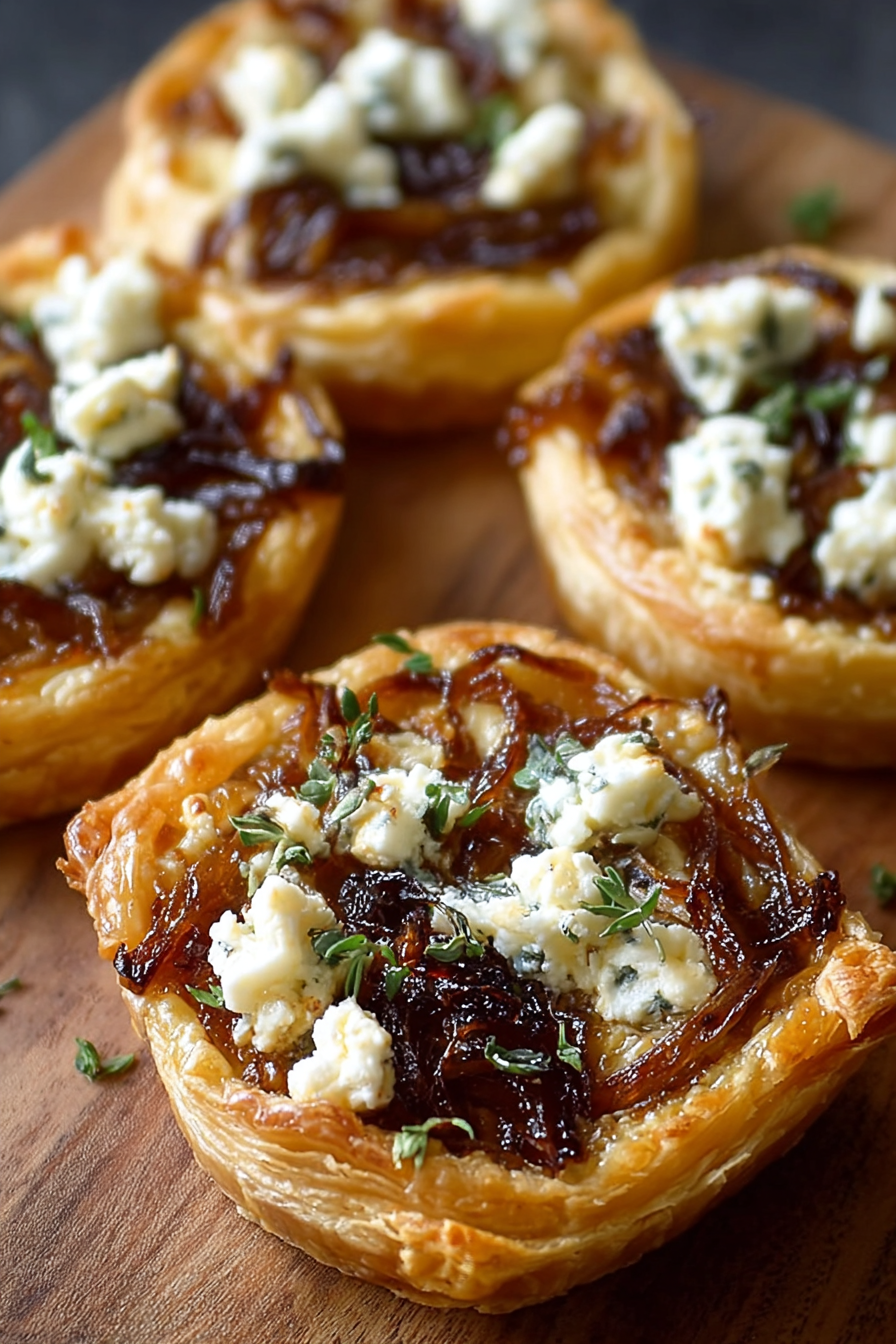
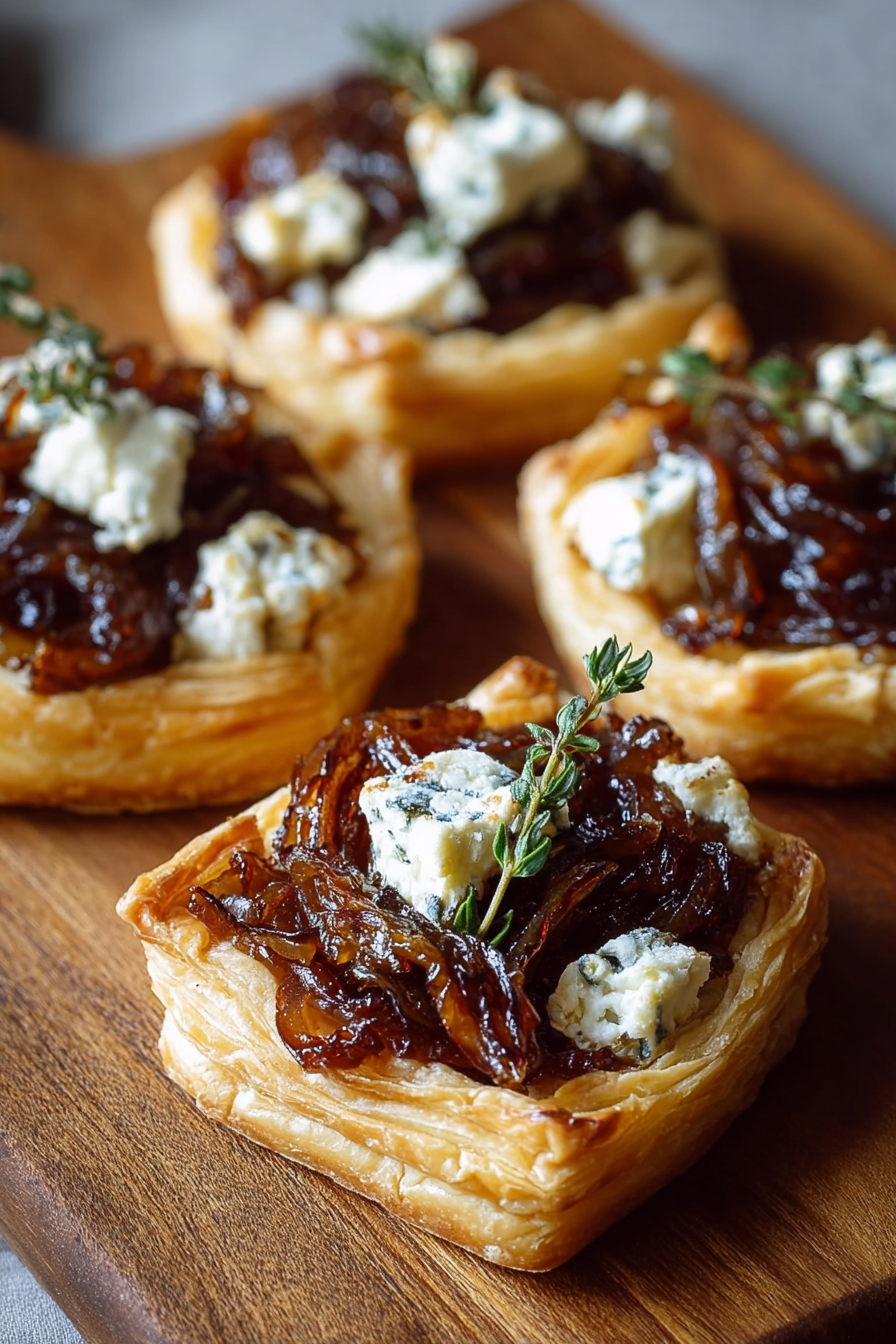
Buttery puff pastry topped with deeply caramelized onions and tangy goat cheese—an elegant yet simple tart perfect for brunch, appetizers, or a weeknight treat.

This caramelized onion and goat cheese tart began as an experiment on a rainy Saturday when I wanted something comforting but not heavy. The combination of slowly softened yellow onions and creamy, tangy goat cheese on a buttery sheet of puff pastry is one of those pairings that feels both rustic and refined. I first made it for a small dinner party; the smell of sweet onions filling the kitchen drew everyone to the counter and the tarts disappeared in minutes. It has since become my go-to for casual entertaining and cozy weekend brunches.
What makes this preparation special is the time you invest in the onions. Caramelization is a slow transformation where natural sugars develop deep color and complex flavor—sweet, savory, and slightly nutty. Combining that with crumbly goat cheese creates a contrast of textures: crisp, flaky pastry, silky onions, and creamy tang. Over the years I’ve refined timing, seasoning, and assembly to get reliably golden pastry and richly flavored filling every time.
I still remember the first time I served this at a family gathering—my aunt asked for the recipe between bites, and my husband declared it a keeper. It’s become a small ritual in our home: the scent of the onions means good food and conversation ahead.
What I love most is how simple techniques—slowly cooking onions and using good pastry—create something that feels celebratory. Family and friends always ask for seconds, and the leftovers are just as delicious the next day when reheated carefully.
Once cooled, store leftover tarts in an airtight container in the refrigerator for up to 3 days. To preserve crispness, place a paper towel under each tart to absorb excess moisture. Reheat in a preheated 350°F (175°C) oven for 8–10 minutes, or until warmed through and flaky. For longer storage, place assembled but unbaked tarts on a baking sheet, freeze until solid, then transfer to a labeled freezer bag; bake from frozen at 400°F (200°C) adding a few extra minutes to the bake time. Avoid microwaving as it makes the pastry soggy.
If you need to adapt ingredients, here are reliable swaps: replace goat cheese with ricotta mixed with a splash of lemon for milder tang, or use cream cheese blended with a teaspoon of white wine vinegar for similar acidity. For a dairy-free version, use a firm, spreadable plant-based cheese and substitute the butter with an extra tablespoon of olive oil. Use puff pastry labeled gluten-free if you need a gluten-free option—but expect slightly different texture. Swap yellow onions for sweet Vidalia or slowly roasted shallots for a subtler sweetness.
These tarts pair beautifully with a bright salad—think arugula with lemon vinaigrette—or alongside roasted beets and toasted walnuts for a composed plate. Serve as elegant finger food at a cocktail party, or plate two with mixed greens and a light soup for brunch. Garnish with fresh thyme leaves, a drizzle of good olive oil, or a sprinkle of flaky sea salt just before serving to enhance aroma and texture.
Onion tarts draw inspiration from rustic European bakes where simple, high-quality ingredients are celebrated. Variations exist across France and neighboring regions—tarts and galettes featuring caramelized onions, cheeses, and herbs are staples in bistros and home kitchens alike. The interplay of sweet caramelized onions and tangy cheeses reflects centuries of savory-sweet experimentation in continental cooking.
In spring and summer, add a scatter of fresh herbs like chives or basil and top with thinly sliced tomatoes for brightness. In autumn, swap half the goat cheese for thinly sliced roasted pears or apples and finish with a drizzle of aged balsamic. Winter calls for heartier additions—sautéed mushrooms or a smear of roasted garlic paste under the onions makes the tarts cozy and warming.
Cook the onions a day ahead and keep them refrigerated in a shallow container to cool quickly. On the day you’re serving, assemble the tarts and bake right before guests arrive—this minimizes time in the kitchen and maximizes flavor. If you’re prepping for a buffet, bake tarts earlier and reheat just before serving to keep pastry crisp. Use small disposable aluminum trays to transport baked tarts for picnics or potlucks.
These tarts are simple yet showy, combining technique and good ingredients. I encourage you to make this recipe your own—experiment with herbs, cheeses, or a touch of honey for a sweet note. Serve warm, share generously, and enjoy the comfort of good food and company.
Caramelize onions slowly over medium to medium-low heat for about 25 minutes to develop deep, sweet flavor without burning.
Use an egg wash on the exposed pastry edges to achieve a glossy, deep golden finish in the oven.
Make the onions a day ahead to save time; reheat gently before assembling so the pastry bakes crisp.
To avoid soggy bottoms, don’t overload the pastry with onions—leave a 1/2-inch border and use a modest amount of filling.
This nourishing caramelized onion and goat cheese tarts recipe is sure to be a staple in your kitchen. Enjoy every moist, high protein slice — it is perfect for breakfast or as a wholesome snack any time.
This Caramelized Onion and Goat Cheese Tarts recipe makes perfectly juicy, tender, and flavorful steak every time! Serve with potatoes and a side salad for an unforgettable dinner in under 30 minutes.
Preheat the oven to 400°F (200°C). Line a baking sheet with parchment paper and position an oven rack in the center.
Heat 2 tablespoons olive oil and 1 tablespoon butter in a large skillet over medium heat. Add thinly sliced onions and a pinch of salt. Cook, stirring often, about 25 minutes until deeply golden. Stir in 1 teaspoon thyme and season with salt and pepper.
Roll out the thawed puff pastry on a lightly floured surface and cut into 6 equal squares. Transfer squares to the prepared sheet, leaving room between them.
Spoon caramelized onions onto the center of each square, leaving a 1/2-inch border. Crumble about 4 ounces total goat cheese evenly across the tarts (roughly 1 ounce per tart).
Fold corners slightly inward to form a rim and brush exposed pastry with beaten egg. Bake at 400°F (200°C) for 12–15 minutes until pastry is puffed and golden.
Let the tarts rest on the baking sheet for 5 minutes, then transfer to a rack. Serve warm, garnished with extra thyme if desired.
Last Step: Please leave a rating and comment letting us know how you liked this recipe! This helps our business to thrive and continue providing free, high-quality recipes for you.
Leave a comment & rating below or tag
@aiolirecipe on social media!

A cozy, colorful salad that celebrates autumn flavors — roasted butternut squash and Brussels sprouts tossed with pasta, cranberries, pecans, and tangy feta, finished with a balsamic vinaigrette.

Bright, tangy cilantro-lime marinated flank steak served over rice with black beans, corn, fresh veggies and creamy avocado for a fast, healthy weeknight bowl.

Buttery crescent rolls filled with a sweet pecan pie–inspired filling — a quick, crowd-pleasing dessert perfect for holidays or weeknight cravings.
Leave a comment & rating below or tag @aiolirecipe on social media!
Enjoyed this recipe? Share it with friends and family, and don't forget to leave a review!
This recipe looks amazing! Can't wait to try it.
Comments are stored locally in your browser. Server comments are displayed alongside your local comments.
Join to receive our email series which contains a round-up of some of our quick and easy family favorite recipes.
