
S’mores Cookie Bars

A nostalgic twist on the campfire favorite—chewy cookie layers sandwich milk chocolate and billowy marshmallow for gooey, sliceable s’mores bars.

This recipe started as a way to bring the campfire into the kitchen on rainy summer evenings. I remember the first time I made these s’mores cookie bars: the house filled with the warm, toasty aroma of graham and brown sugar while my kids hovered in the doorway, eyes wide at the sight of a gooey marshmallow center sandwiched between buttery cookie. It’s a recipe that captures that exact moment of pulling a warm s’more off a stick and turning it into a neat, portable bar. It’s playful yet dependable and has become my go-to when I want something both nostalgic and effortless.
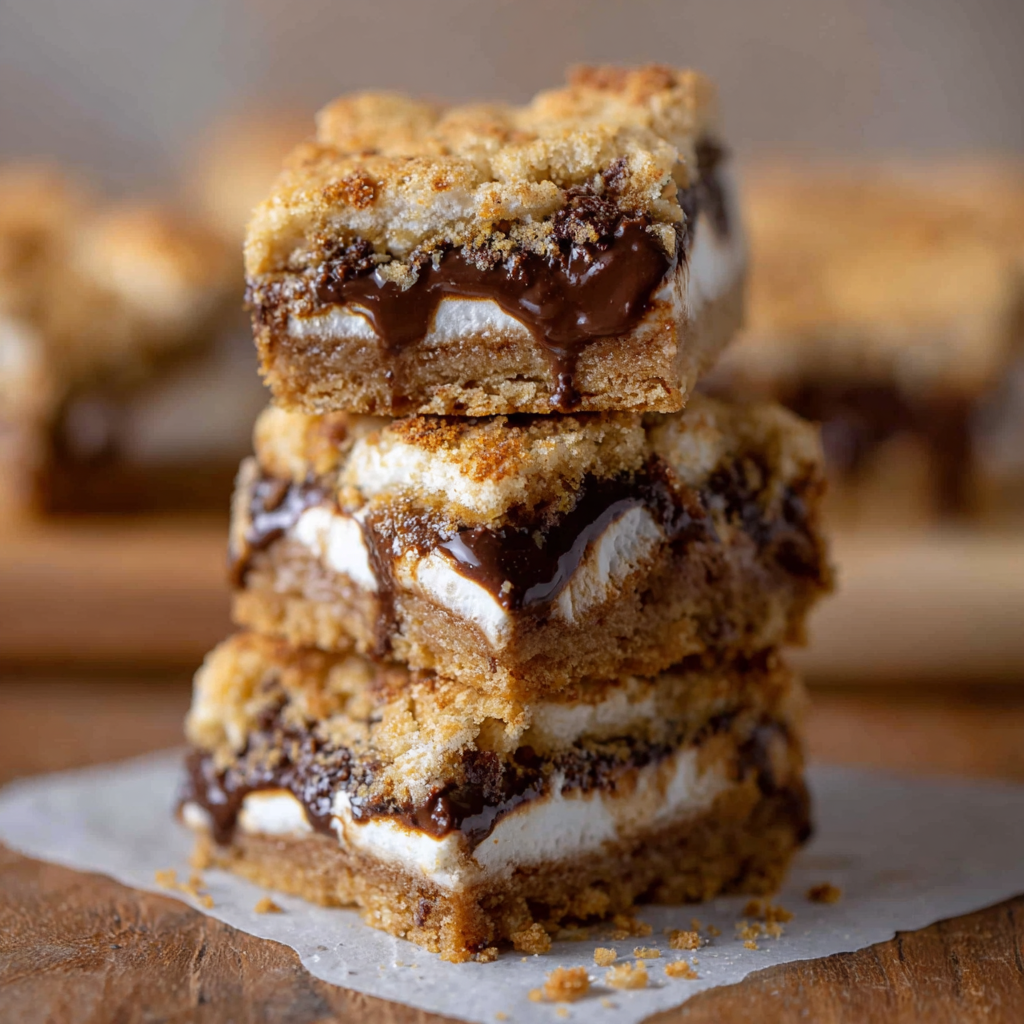
I discovered this combination while trying to simplify a messy, sticky s’more into something you could serve at a picnic without worrying about melted chocolate dripping everywhere. The texture is what sold me: a slightly crisp edge, a tender, chewy cookie layer, and a molten marshmallow and chocolate middle that sets just enough to slice cleanly after cooling. These bars deliver the classic flavors of graham cracker, milk chocolate, and marshmallow in a straightforward format that everyone seems to adore.
Why You'll Love This Recipe
- Ready in under an hour from start to finish, with only 25 minutes of oven time so it’s perfect for weeknight baking or an easy dessert for guests.
- Uses pantry staples like all-purpose flour, brown sugar, and graham crackers; no special ingredients required and no campfire necessary.
- Make-ahead friendly: you can assemble and freeze the bottom cookie layer and top layer separately, then finish the bake on the day you plan to serve.
- Crowd-pleasing: the familiar s’mores flavor profile appeals to kids and adults, making it ideal for potlucks, picnic boxes, or after-dinner treats.
- Simple assembly with forgiving technique; the trick is chilling the bottom layer so it flips cleanly and gives you that perfect cross section.
My family’s reaction the first time I made these was instant—everyone asked for a second piece. I’ve tweaked the method to keep the marshmallow from oozing out the sides while still staying gooey in the center. Over time I learned that freezing the first cookie slab briefly makes assembly far less stressful, and using standard milk chocolate bars keeps the flavor balanced and nostalgic.
Ingredients
- Butter, 1/2 cup: Use unsalted or salted butter softened to room temperature. If you use unsalted, add a pinch more salt to taste. Properly softened butter gives you a tender, not greasy, cookie texture. I often use Plugr or Land O Lakes.
- Brown sugar, 1/3 cup: Light brown sugar adds moisture and that subtle molasses flavor that mimics toasted graham crust.
- Granulated sugar, 1/4 cup: Balances the brown sugar and helps the edges crisp slightly during baking.
- Egg, 1 large: Acts as the primary binder; room temperature helps it incorporate smoothly.
- Vanilla extract, 1 teaspoon: A good-quality vanilla round out the flavor—use pure vanilla rather than imitation if possible.
- All-purpose flour, 1 1/2 cups: Provides structure. Spoon and level when measuring to avoid a dry dough.
- Graham crackers, 1/2 cup finely crushed: About 3 to 4 sheets crushed to fine crumbs; this gives the dough a toasty, graham note and a slight granularity that is essential to the s’mores character.
- Salt, 1/4 teaspoon: Enhances sweetness and balances the chocolate flavors.
- Baking soda, 3/4 teaspoon: Gives a modest rise and chew without spreading too thin.
- Milk chocolate bars, 5 standard Hershey bars: Place whole or broken pieces across the layer for even chocolate distribution.
- Marshmallow fluff, 1 1/2 cups: Fluff or creme spreads easily and gives that iconic marshmallow interior. Fluff sets better than whole marshmallows for a smooth slice.
Instructions
Preheat and prepare pan: Preheat the oven to 350°F. Line an 8 by 8 inch baking pan with parchment paper, leaving an overhang for easy removal. This prevents sticking and makes slicing neat. Make sure the parchment sits flat in the pan to avoid uneven baking. Cream sugars and butter: In a medium bowl, cream 1/2 cup softened butter with 1/3 cup brown sugar and 1/4 cup granulated sugar until light and combined, about 1 to 2 minutes with a hand mixer on medium. Add 1 large egg and 1 teaspoon vanilla and mix until smooth. Proper creaming traps air for a tender crumb. Combine dry ingredients: Whisk together 1 1/2 cups all-purpose flour, 1/2 cup finely crushed graham crackers, 1/4 teaspoon salt, and 3/4 teaspoon baking soda. Add the dry mix to the wet ingredients and stir just until the flour disappears. Avoid overmixing to keep the dough tender rather than tough. Form and chill the base layer: Press half of the dough evenly into the prepared baking pan. Smooth the surface with a spatula. Remove the parchment with the dough from the pan and place it on a tray in the freezer for about 10 minutes to firm up. Reline the pan with fresh parchment and press the remaining dough into an even layer. Chilling makes the slab easier to flip without cracking. Assemble chocolate and marshmallow: Place the 5 Hershey bars across the bottom dough layer, breaking pieces to cover the surface. Spread 1 1/2 cups marshmallow fluff evenly over the chocolate. Carefully flip the chilled cookie slab on top of the fluff and chocolate, aligning edges. Take care to press gently so the top layer stays intact and the marshmallow fills gaps rather than oozing out. Bake and cool: Bake at 350°F for 25 minutes until the top is set and lightly golden on the edges. Remove from the oven and cool completely in the pan on a wire rack, at least 60 to 90 minutes. Cooling is crucial; it allows the marshmallow to firm so you can slice clean bars with a sharp knife.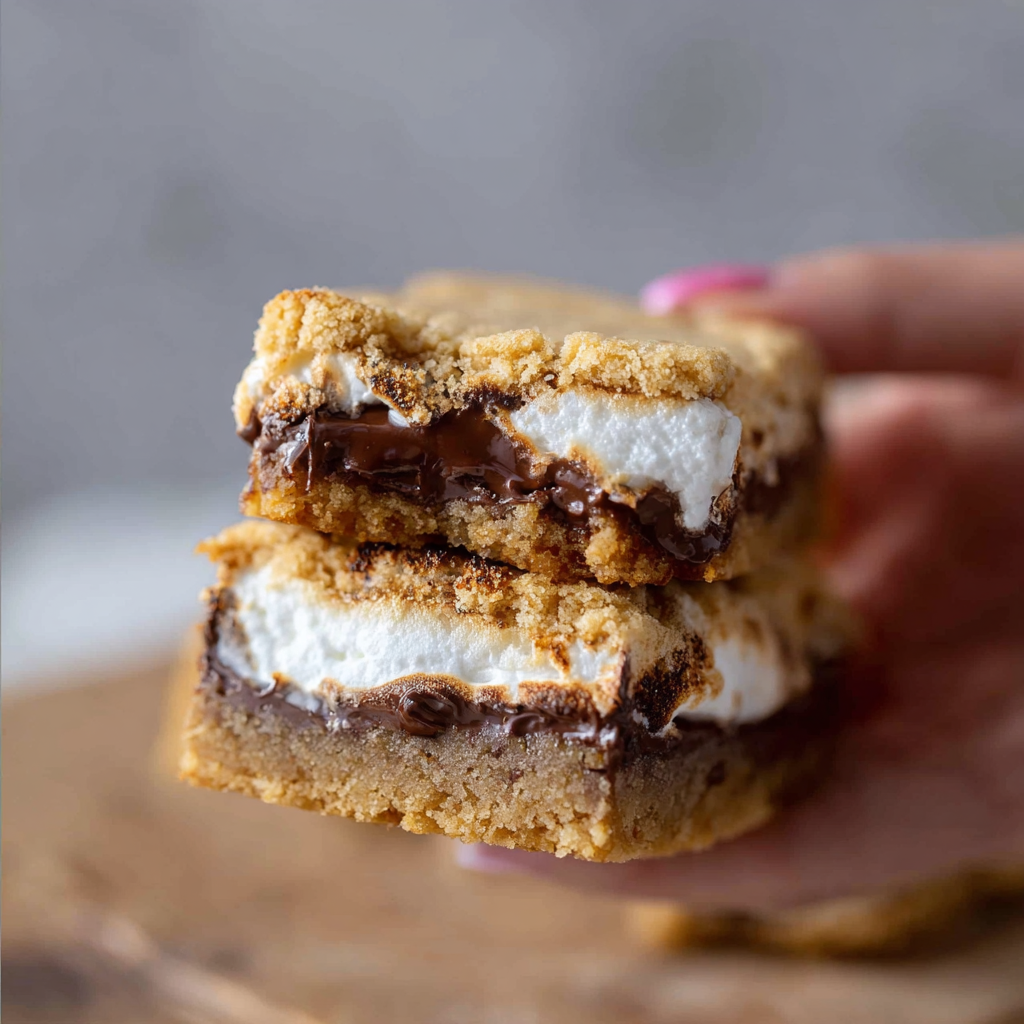
You Must Know
- These bars freeze well for up to 3 months. Wrap tightly in plastic and store in an airtight container to avoid freezer burn.
- Allow the pan to cool fully before slicing; warm marshmallow will smear and make slicing messy. Waiting yields those neat cross sections you want.
- High in sugar and fat, these are best enjoyed in moderation. One 2-inch square is a satisfying portion for dessert.
- Swap chocolate varieties if desired, but milk chocolate keeps the nostalgic s’mores profile intact.
My favorite part of making these is watching the marshmallow layer settle into ripples under the top cookie. Family members always comment on how the interior looks like a classic campfire s’more even though it was baked in a modern oven. I love that this recipe bridges a childhood memory and a practical everyday dessert.
Storage Tips
Store cooled bars in an airtight container at room temperature for up to 3 days. For longer storage, wrap individual bars in plastic wrap and place them in a freezer-safe bag for up to 3 months. To reheat from frozen, thaw at room temperature for 30 minutes then warm gently in a 300°F oven for 5 to 8 minutes to revive the gooey center without melting the chocolate into a puddle. If refrigerated, expect the texture to firm; brief reheating returns some of the chew.
Ingredient Substitutions
If you prefer darker chocolate, swap in semisweet or dark chocolate bars, noting that bitterness increases and the overall sweetness decreases. For a nutty twist, fold 1/3 cup finely chopped toasted pecans into the dough. To avoid marshmallow fluff, use mini marshmallows spread across the chocolate but reduce oven time slightly and tent with foil to prevent over-browning. For a gelatin-free marshmallow option, check the fluff label or seek vegan marshmallow products; this will alter texture slightly.
Serving Suggestions
Serve bars slightly warm with a scoop of vanilla ice cream for a dessert that feels indulgent. For a picnic, wrap bars individually in parchment and tie with twine. Garnish plated servings with a sprinkle of crushed graham crackers and a few chocolate shavings for presentation. They pair well with coffee or a cold glass of milk for an authentic s’mores vibe.
Cultural Background
S’mores are a classic American campfire treat with roots in early 20th century camp cookbooks, typically consisting of toasted marshmallow and chocolate sandwiched between graham crackers. These bars are a modern adaptation that preserves the original flavors while creating a cleaner, oven-friendly format that’s easier to scale and serve. The idea of baking the components into a bar shows how comfort foods evolve to fit contemporary kitchens.
Seasonal Adaptations
In late summer, make these for backyard gatherings as a no-mess s’mores option. For winter holidays, add a pinch of cinnamon and swap for dark chocolate to give a warmer spice profile. On chilly evenings, serve warm with hot cocoa to echo the cozy campfire feeling. For spring picnics, consider slicing thin squares and packing them in a cooler for a sweet treat outdoors.
Meal Prep Tips
Prepare the dough up to 2 days in advance and keep it wrapped in the refrigerator. You can also press the bottom dough into parchment and freeze for up to one month; thaw briefly before assembling. When packing for lunches, use sturdy, insulated containers to prevent the marshmallow from becoming overly soft in warm weather. Cut bars with a hot knife for the cleanest edges: heat a chef’s knife under hot water, wipe dry, then slice.
These s’mores cookie bars are a little bit of nostalgia and a whole lot of shareable joy. They’re forgiving, flexible, and reliably crowd-pleasing—give them a try at your next gathering and watch how quickly they disappear.
Pro Tips
Chill the first cookie slab on parchment in the freezer for 10 minutes to make flipping easier and prevent cracking.
Use a hot, dry knife for clean slices: run the blade under hot water, dry it, and slice with a single smooth motion.
If your butter was too cold, cream it a little longer or soften briefly in 5 second bursts in the microwave to reach room temperature consistency.
Press dough evenly into the pan to ensure uniform baking and consistent layers.
This nourishing s’mores cookie bars recipe is sure to be a staple in your kitchen. Enjoy every moist, high protein slice — it is perfect for breakfast or as a wholesome snack any time.
FAQs about Recipes
Can I use mini marshmallows instead of marshmallow fluff?
Yes. You can use mini marshmallows instead of marshmallow fluff, but reduce the bake time slightly and tent the pan with foil to avoid browning the top too much.
How should I store the bars?
Store in an airtight container at room temperature for up to 3 days or freeze for up to 3 months. Thaw before reheating gently.
Tags
S’mores Cookie Bars
This S’mores Cookie Bars recipe makes perfectly juicy, tender, and flavorful steak every time! Serve with potatoes and a side salad for an unforgettable dinner in under 30 minutes.
Ingredients
Cookie dough
Assembly
Instructions
Preheat and prepare pan
Preheat oven to 350°F. Line an 8x8 inch baking pan with parchment paper, leaving an overhang for easy removal. Ensure the parchment sits flat to avoid uneven baking.
Cream butter and sugars
Cream 1/2 cup softened butter with 1/3 cup brown sugar and 1/4 cup granulated sugar until light. Add 1 large egg and 1 teaspoon vanilla and mix until smooth.
Combine dry ingredients
Whisk together 1 1/2 cups all-purpose flour, 1/2 cup finely crushed graham crackers, 1/4 teaspoon salt, and 3/4 teaspoon baking soda. Add to wet ingredients and mix until just combined.
Form and chill the base layer
Press half of the dough evenly into the prepared pan on parchment, remove and freeze for 10 minutes. Reline the pan and press the remaining dough into an even layer.
Assemble chocolate and marshmallow
Place 5 Hershey bars across the dough, break to fit. Spread 1 1/2 cups marshmallow fluff over chocolate. Flip the chilled dough slab on top and align edges, pressing gently.
Bake and cool
Bake at 350°F for 25 minutes until edges are lightly golden. Cool completely in the pan on a wire rack for 60 to 90 minutes before slicing for best results.
Last Step: Please leave a rating and comment letting us know how you liked this recipe! This helps our business to thrive and continue providing free, high-quality recipes for you.
Nutrition
Did You Make This?
Leave a comment & rating below or tag
@aiolirecipe on social media!
Categories:
You might also like...

Fall Harvest Pasta Salad
A cozy, colorful salad that celebrates autumn flavors — roasted butternut squash and Brussels sprouts tossed with pasta, cranberries, pecans, and tangy feta, finished with a balsamic vinaigrette.

Cilantro Lime Steak Bowls
Bright, tangy cilantro-lime marinated flank steak served over rice with black beans, corn, fresh veggies and creamy avocado for a fast, healthy weeknight bowl.

Pecan Pie Crescent Rolls
Buttery crescent rolls filled with a sweet pecan pie–inspired filling — a quick, crowd-pleasing dessert perfect for holidays or weeknight cravings.
Did You Make This?
Leave a comment & rating below or tag @aiolirecipe on social media!
Rate This Recipe
Share This Recipe
Enjoyed this recipe? Share it with friends and family, and don't forget to leave a review!
Comments (1)
This recipe looks amazing! Can't wait to try it.
Comments are stored locally in your browser. Server comments are displayed alongside your local comments.
Hi, I'm Olivia!
What's Popular

30-Minute Meals!
Join to receive our email series which contains a round-up of some of our quick and easy family favorite recipes.